
Building a solid Swift app with Needy Delivery
📅 2020-12-09
This is the first part of our Needy Delivery story. Read the second part here.
With the development of Covid-19, going outside for our daily added more difficulty. Picking up food at our local grocery store became a potential health risk. Social distancing has become our norm, where individuals keep a safe distance from each other to avoid any possible spread of infection.
To help those get access to food donations during these troubling times, we made Needy Delivery.
What is Needy Delivery?

The purpose is to allow non-profit organizations like food banks to deliver food to those in need, without requiring people to go on location. This is similar to other food delivery apps like Uber Eats or DoorDash but focused on charitable donations.
I worked on developing the iOS client and the Django server. Here are the lessons we learned while building our app.
Starting from a tutorial
The first iteration was an Uber Eats clone that we followed from a tutorial.
Initially, the code was outdated and written years ago. Once the necessary updates were made, the app had the core features of a food delivery app.
Images were provided by the tutorial, but otherwise, the designs did not require additional customization.

Our designer provided the content for the Needy Delivery brand and brought a more modern and clean look. This included images, icons, fonts, and colors.

Adding first-party login
Using only third-party login like Facebook simplified authentication because it didn’t need to handle usernames or passwords.
But we wanted to allow users without Facebook accounts to sign up, so we added our own first-party login.

Creating the forms was the easy part.
But we also have to validate each form field and handle any errors from the server. Several issues are possible like the server is unavailable or the username is already taken.
With Facebook login, users can easily log in again without having to re-enter their username and password. This is because the Facebook token is automatically saved to the device. To provide the same convenience, we implemented the KeychainAccess library to save our token to the iOS Keychain.
Also, the original designs had text shown against a background image. This made it harder to read the text in some situations. Adding a blurred background provided a soft contrast for reading text while still blending into the background image.

No reason to swipe back
Once a user has logged in, there is no reason to swipe all the way back to the launch screen. This doesn’t break anything in particular but provides an unusual experience to the user.
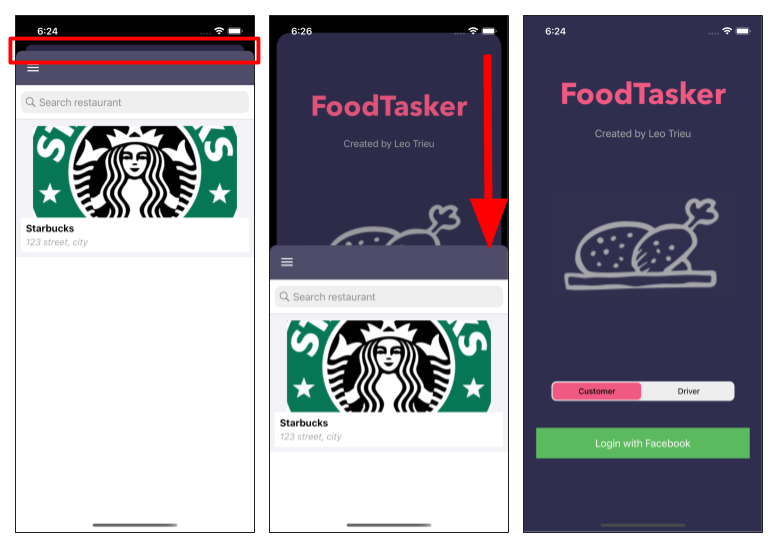
The first screen shows the initial view after login. The red box outlines the visible edge of the previous launch screen.
The second screen shows a user swiping down, exposing half of the launch screen. The final screen shows the user has returned to the launch screen. This almost looks like the user has logged out of the app without explicitly doing so.
Under the hood, iOS keeps a stack of views that a user has previously visited. To resolve this issue, the stack is reset and the restaurant view is set to the root view after a user has logged in.

Now the edge of the previous launch screen cannot be seen nor can the user swipe back. Instead, they would need to use the logout button to go back to the launch screen.
Handling errors
Often times the app would silently ignore errors. This was frustrating for debugging issues and we didn’t want users to be wondering why nothing happened when they pushed a button. So we added error prompts whenever something didn’t go right and tried to anticipate most of these scenarios. If users are getting errors, we hope they will tell us so we can fix them!

Using Docker so every install is the same

One of my pet peeves is when a project has a complicated install process. It is even worse when each developer has a different setup on their workstation. So we used Docker to package the Django app into a portable Docker image. The dependencies installed onto the Docker image is isolated from the host computer. Every developer always uses the same version of the application. Docker Compose is then used to deploy and coordinate the Docker containers. New developers will only need to install Docker and Docker Compose. This also means the deployment for local development and production are almost exactly the same.
Deploying to Digital Ocean
Initially, the Django app used SQLite for the database and stored images locally on the local filesystem. This was fine for local development, but we needed to make changes to deploy onto the Digital Ocean App Platform.

The App Platform has an ephemeral filesystem, meaning all new files are deleted on every deployment. This does not work well with SQLite since database files are stored locally on the same host as Django. We chose to use Postgres instead as this is the most popular database in the Django community. Image files also needed to be stored on a remote service. Digital Ocean’s Spaces service was the best solution for this case. Spaces is an S3-compatible object storage solution, which meant well-supported libraries like boto3 were compatible with it Now the infrastructure on Digital Ocean looks like this:

Conclusion
We plan to release to the Apple Store soon and hope to help those in need to get access to food donations during these troubling times. We learned a lot from each other and look forward to working on future projects together.
Read from our designer’s perspective: https://www.leviaustin.design/work/needy-delivery